Why do I need a blog?
Let’s look at the fundamentals - penning down your thoughts isn’t easy, it forces you to think, which brings clarity and perspective. For example - at Amazon, meetings to present ideas do not start with PowerPoint slides but with dense and structured memo(s).
It’s easy to write bullet points on a slide and speak for hours on that topic but to structure it and pen it down is whole new ball game, you can’t just wing it.
What do I need — Prerequisites?
- Hugo static site generator — installation steps
- Github account — create an account
- Domain name — with any registrar of your choice (Godaddy, NameCheap etc.)
How do I get started?
Now that we have that out of the way, let us get down to business. Let’s start off by creating a Hugo static site on our local machine. Run the following command to create the Hugo site for your blog.
hugo new site personal_blog
Replace personal_blog with your domain name (mine would be rahuldharan.com) this keeps things simple and easy to manage.
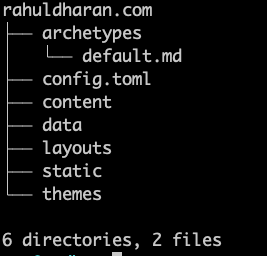
It should have created the following directories post running the command —

All nice and dandy, let’s add a theme, shall we? You can make do without a theme as well but who doesn’t love some colors!
Themes are a big part of Hugo, where community builds and distributes themes, they bring in the much needed “life” to each blog/website. To get a catalogue of themes — visit Hugo Themes.
We’ll be using a clean and simplistic theme — Zen. To install the theme run the following command —
git clone https://github.com/frjo/hugo-theme-zen.git themes/zen
Once this is setup we’ll need to configure the config.yaml file, we can use this as the base config file. Change the contents of the config file according to your preferences (which is highly customizable).
To run the site generator and serve the files use (this does not generate the static files) -
hugo server --watch
Visit http://localhost:1313 to view the generated site!
How do I blog ?
Let’s create our first blog post with one simple command —
hugo new blog/my-first-blog.md
Notice how the blog files is a *.md file? It’s because Hugo supports MarkDown syntax; We’ll be writing our blog posts using MarkDown.
This creates our first blog post, navigate to content/blog, in there you’ll find my-first-blog.md. This is the file we’ll need to edit, currently in the file draft: true is set, which means Hugo will ignore this page (since this is a draft), so change it to draft: false. Go ahead and write your heart out.
Once you’re done, you’ll notice that the website (your blog) has refreshed automatically and a new post entry is present!
Voila we’re done! (not quite)
Now we’ve successfully setup the blog on our local machine all we need to do is to deploy it to Github pages.
Deploying to Github pages
This is the simplest step, create a Github repository with the following name format <username>.github.io(replace <username> with your actual Github username).
Now push the public folder generated inside your project directory to the Github repository.

*Step by step process to set up Github pages
Now you can visit https://<username>.github.io to view your website.
Mapping custom domain to Github pages
We’re at the final leg of our journey — mapping custom domain to Github pages. So we can access our blog using a custom domain.
-
Purchase a domain name from your favorite domain registrar (I’m using Godaddy) — Okay, this is the only step where you have to spend money.
-
Navigate to the settings page of your Github pages repository and then scroll to the Github pages section, enter your custom domain details here -

-
Now login to your registrar (Godaddy, NameCheap etc.), navigate to manage DNS section and make the following changes.
-
Set A records to — 185.199.108.153, 185.199.109.153, 185.199.110.153 and 185.199.111.153.
-
To redirect www subdomain to the original domain, add a
CNAMErecord with your GitHub pages profile URL with a .(dot) at the end, for example<username>.github.io.. -
In your repository (Github pages) add a
CNAME(filename is CNAME) file which has your website domain name. For me it israhuldharan.com

Voila we’re done, now wait for 24 hours and you have your personal blog setup. If you want to check out how it looks visit mine — rahuldharan.com.
*Step by step process to map custom domain
Happy blogging!
We write to taste life twice, in the moment and in retrospect. — Anaïs Nin


